How to Manage Your Claims
Overview
This guide walks employees through submitting, viewing, editing, and managing their own claims in the Self-Service Portal of the Payroll Workspace. You’ll learn how to request reimbursements or expense claims, track claim statuses, and update or withdraw claims when necessary.
The self-service claim feature empowers employees to take ownership of their reimbursement process, while giving payroll administrators clear visibility into claim submissions.
Prerequisites
- Access to the Payroll workspace platform
- A claim category must already exist in the system (created by Payroll Administrators)
- Accurate claim details (effective date, amount, category, and supporting remarks)
When You Need This
- Submitting reimbursement or expense requests
- Checking the approval status of a claim you submitted
- Updating details of an existing claim (before final processing)
- Cancelling or deleting claims that are no longer valid
Step-by-Step Instructions
Step 1: Access the Claims Page
- Log into your Organogram Payroll workspace at
payroll.organogram.app. - From the left-hand sidebar, click "Profile".
- Under Profile, select "Claims".
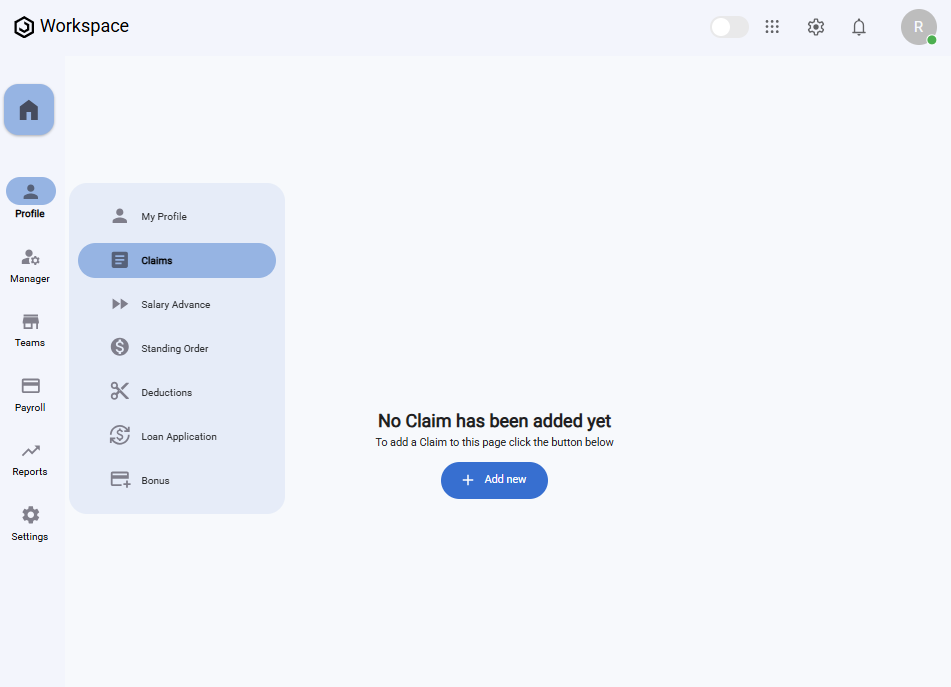
Step 2: Submit a New Claim
- On the Claims page, click the "Add New" button.
- The Add Claim form will appear.
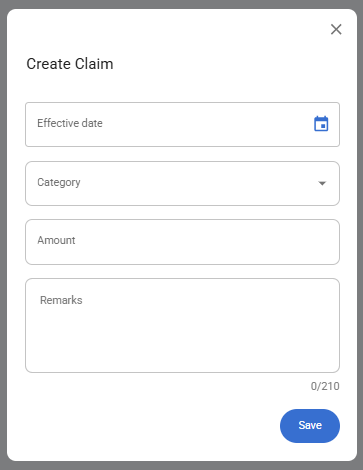
Fill in the following fields:
- Effective Date – Choose the date the claim applies using the datepicker.
- Category – Select the claim category (e.g., Travel, Medical).
- Amount – Enter the claim amount.
- Remarks – Add any notes or comments to support your claim.
- After filling in the form, click the "Save" button.
- A notification will appear: "Claim created successfully".
- The newly submitted claim will display in the Claims Table.
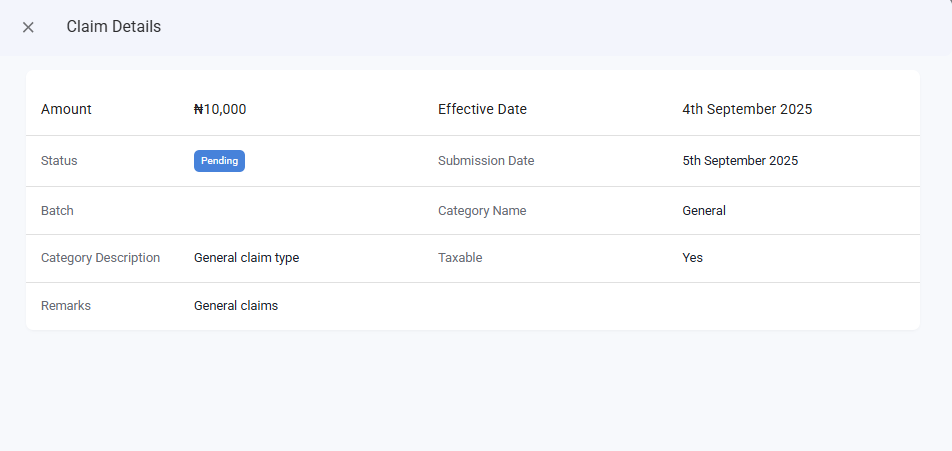
Step 3: View a Submitted Claim
- In the Claims Table, locate the claim you wish to view.
- Click the three-dot menu icon (⋮) on the right-hand side of the row.
- Select "View".
- A full-screen details dialog will display:
- Amount
- Effective Date
- Status (Approved, Pending, or Declined)
- Submission Date
- Category
- Taxable
- Remarks
Step 4: Edit a Submitted Claim
- Locate the claim you want to update in the Claims Table.
- Click the three-dot menu icon (⋮).
- Select "Edit".
- The Edit Claim form will open, pre-filled with the existing details.
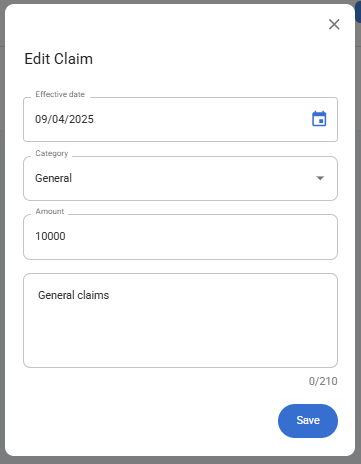
- Make the necessary changes (e.g., Effective Date, Category, Amount, Remarks).
- Click "Save".
- A notification will appear: "Claim updated successfully".
⚠️ Note: Claims that have already been processed/approved may not be editable.
Step 5: Delete a Claim
- In the Claims Table, click the three-dot menu icon (⋮) next to the claim entry.
- Select "Delete".
- A confirmation dialog will appear asking if you want to delete the claim.
- Click "Yes" to confirm.
- A notification will appear: "Claim deleted successfully".
What You’ll See After Submitting
- Your submitted claims appear in the Claims Table.
- Each row displays key details like Category, Amount, Effective Date, Remarks, and Status.
- The Status column reflects whether the claim is Pending, Approved, or Declined based on payroll administrator actions.
